
I’m taking an online course and the school uses “Canvas” for class discussion. Can you give me a quick tutorial on the basics of text colors, links, images and embedding videos recorded from my Webcam? Thanks so much!
Canvas, or The Canvas Learning Management System, as it’s known more formally, is one of the most popular online course software systems on the market. It has a zillion features and supports lots of backend features and capabilities ideal for faculty too, including online quizzes, grading, attendance, even a tool that lets teachers keep an eye on which students might be at risk based on historical login and interaction trends.
I know it well as faculty at the University of Denver: We use Canvas for all our online courses, which means I spend a few hours every day using the program when class is in session. Mostly I really like it and find it’s straightforward, though grading assignments, peer review matchups and some of the other teacher aspects can be a bit befuddling.
Making this more interesting, Canvas introduced a new rich content editor the beginning of 2020 which dramatically improved how students and faculty both can format, lay out, and manage their posts and articles. If you’ve used Microsoft Word or Apple Pages, you should be able to puzzle through most of the basic features, but let’s have a look, starting with bold and italic and ending with embedded videos!
TEXT FORMATTING BASICS FOR CANVAS USERS
The most basic set of features are text formatting: bold, italics, underline, font size, and so on. Open up a spot in Canvas where there’s an input window and you’ll see something like this:
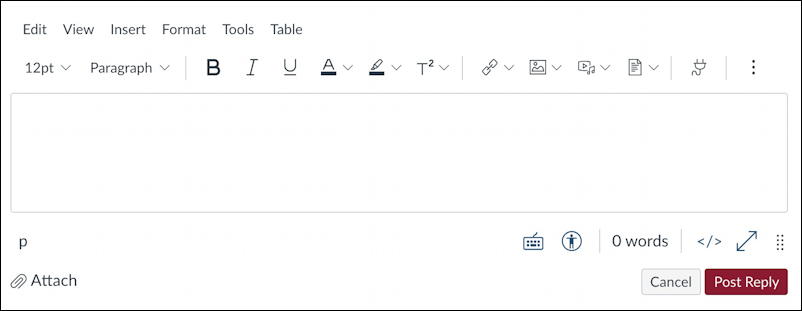
If you don’t see much of anything, you might be in HTML or raw text input mode: Click on the “</>” button on the lower right corner and all of these features should show up.
There are a lot of places to click, so let’s have a tour. First off, there are six areas you can access through menus from the very top, just as if it were a standalone editor program on your PC or Mac: Edit, View, Insert, Format, Tools and Table. Generally speaking, all of the functionality accessible from those is also available through the toolbar, which starts with “12pt v” as you can see.
Click on the three vertical dots icon on the right and even more features will appear:

Left to right, the 12pt allows you to specify font size, Paragraph lets you format blocks of text, then B, I, U, A, marker and T2 let you format individual text elements, representing bold, italics, underline, font color, font background color and super/subscript. Then the link is for adding URL links, adding images, adding media (video), referencing another page or document already in the Canvas system (for example, an assignment page). The tiny electrical plug is to access apps that might be installed, and on the additional mini-toolbar I have shown, again left to right, it’s paragraph alignment (left, center, right), bullet or numbered lists, indentation, clear formatting, table input and construction tools, mathematical equations and, finally, the cloud icon is embed, if you want to embed some HTML or other code on the page!
That’s a LOT so I’d be unsurprised if you’re a bit brain numb right now. No worries, let’s go through the basics…
First off, if you get confused about the toolbar icons, remember again that you can use the text menus. For example, want to insert an image? You can do that from Insert > Image, as shown:

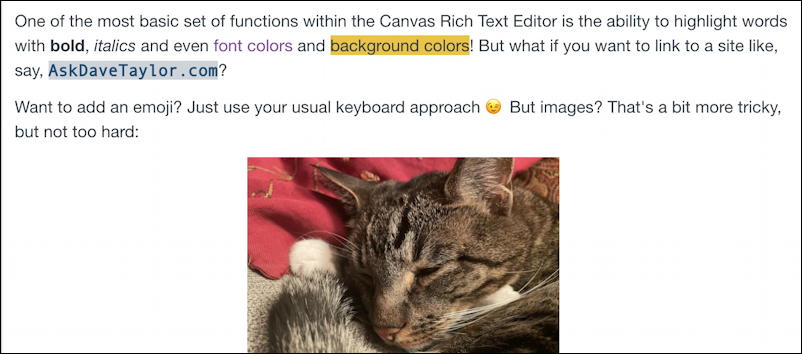
Let’s start composing some content. I’ll just type in a few sentences. To apply a basic formatting like bold or italics to a word or phrase, the approach is always select the word or phrase, then click the corresponding button. In the below, I have a word in bold, another in italics and we’re about to change font color. To do that I have selected the two words I want to change (highlighted in blue) and am poised to click on the Text color icon:

A click and a basic color palette appears:
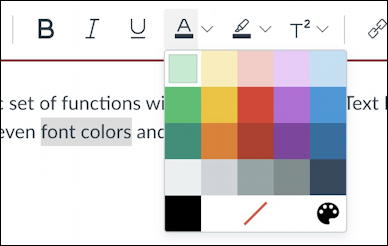
The tiny artist palette on the lower right lets you specify a different color if you don’t like any of those, but for 99% of users, one of these 22 will work just fine. I’ll choose purple. Now, let’s highlight the words “background colors” and click on the pen with an underline icon just to the right of the font color icon and choose yellow:

Notice that Canvas remembers your last color choice, so now the font color icon has a purple underline to show the default and the highlight icon has a yellow underline to show its default. Smart!
To add a link to an external Web page, you’ll use the same technique: type in the word or words you want to link, select them with a click-drag, then click on the tiny chain-link icon. You can see two words highlighted in grey, above. A click on the add link button and this pops up:
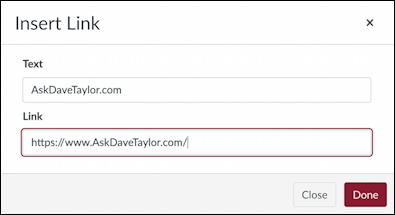
You can tweak the text (what’s shown and clickable) if you want, and you can copy and paste the URL of the destination page or content. Ready? Click “Done” to turn that word or phrase into a clickable link.
That’s the basics. Now let’s look at adding various media.
HOW TO ADD PICTURES AND VIDEO TO CANVAS POSTS
It’s important to remember when you’re poised to insert a photo, video or other content, that it will show up where the cursor is, so before you click, make sure your cursor is in a good spot. I’ll add a photo by moving just below the text and clicking on the tiny “mountain with sun” icon. This pops up:

Now you can just drag and drop a picture, photo or image from your computer onto the rocketship. Or click on the rocket and it’ll let you choose the image you want to upload. Don’t worry about size, we can fix that once it’s uploaded…
Click to choose the image – or drag – and moments later it’ll show as a preview in this upload window:
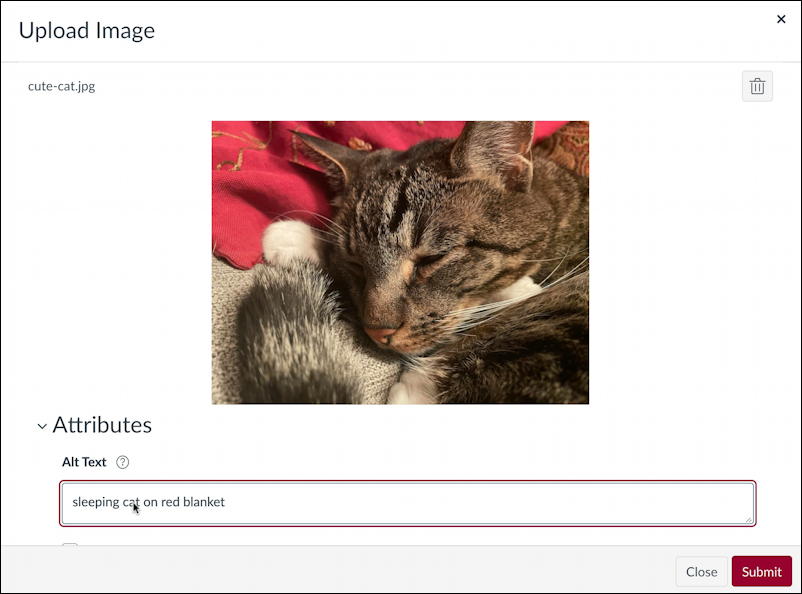
Notice here that I’m taking the extra few seconds to type in a description of the image in the Alt Text box at the bottom. That’s a good habit to instill and particularly helpful if you have any classmates or a teacher with a visual impairment.
Ready to embed this image into your Canvas text area? Click on “Submit” and it’ll upload and show up right in the text edit window:

Click on the image itself and it gets these tiny blue squares on each corner and “Image Options” pops up. You can easily resize the image by clicking and dragging any of those blue squares (called “handles” in computer user interface parlance) towards the center of the image. Image Options also lets you specify sizes, but I like dragging!
Now that we have a cat picture as every Internet post requires, let’s turn to embedding a video. The media upload button on the toolbar is the tiny play button / musical notes icon. Click on it and you’ll see yourself!

If you want to upload a pre-recorded video – or audio file! – click on “Computer” on the top left of this window. Or you can check your microphone and webcam settings by clicking on the corresponding buttons along the bottom, then click “Start Recording” to record yourself from your Webcam. Don’t worry, there’s a 3.. 2.. 1.. countdown so you can take a deep breath first!
Once you’re done recording, you’ll still be in this little window and can preview what you did or even re-record it if you don’t like that first take. All looks good? Click “Submit” and that video will appear in your composition with a thumbnail and play controls:

Pretty simple once you get the hang of it!
Almost done. Before you submit, have a quick glance at the buttons on the lower right of the Canvas rich content editor:

Left to right these are a way to view keyboard shortcuts (looks like an old time radio!), an accessibility checker if you need to ensure that people with visual and other impairments can also understand your post, a word count (handy if the teacher requires a minimum word count for posts), the “</>” button to switch between raw HTML and rich formatted text, the double-headed arrow to enlarge the edit window itself and the dots grid that lets you click and drag downward to also make the edit window bigger. I use the latter almost every time I write in Canvas, actually.
Finally, ready to post? Click on that “Post Reply” and it’s posted, with images, video, colors and more!
Now that should help you bump right to the top of the class with formatting, design and layout options. Good luck!
Pro Tip: I’ve been involved with online education and writing about online tech for years. Please check out my computer and Internet basics help area for tons more useful tutorials while you’re visiting. Thanks!