
Okay, I have a Touchbar MacBook Pro. Now how can I customize it to meet my own needs and workflow?
Congrats on your purchase, but while in some spots Apple refers to the tiny touch screen on your new keyboard as a TouchBar, in other places it refers to it as a Control Strip, so I’m not 100% sure what is the best terminology! I will say that I learned it’s a very weird resolution of 2170 x 60 pixels. Going to be really hard to squeeze ads onto it, but that’s a good thing! 🙂
As you’re learning, however, the actual functions on the TouchBar are user controllable, not cast in stone. Which instantly makes it more cool than a row of function keys (as if the in-app customization isn’t enough). But macOS has some additional tricks up its proverbial sleeve when it comes to the TouchBar too.
Let’s have a look!
First off, a few definitions so we can understand subsequent photos of the TouchBar, which also clarifies how it compares to the Control Strip:

So the Control Strip is just the user customizable region on the right of the TouchBar. Okay, we can live with that.
By default, here’s my TouchBar Control Strip (see, it’s confusing, isn’t it?):

The icon just to the right of the highlighted red button is the music scrubber, visible because I’m listening to music through iTunes.
Tap on the arrow button (highlighted) and the standard function keys expand to fill up the TouchBar:
![]()
But here’s the thing: I really like Siri on my iPhone but on my computer? No thanks. So what I want to do is get rid of it and replace it with something more useful: screen capture.
To make changes to the TouchBar layout and functionality, you need to go into System Preferences… > Keyboard. On the MacBook Pro with TouchBar there are new options!

First thing to check is that you’ve set up “Touch Bar shows” correctly. Here are the three choices:

Experiment with each of them, but my preference is definitely the first, App Controls with Control Strip.
Click on the button “Customize Control Strip…” just below it and you’ll see all the available buttons (to date) for the Control Strip region of your TouchBar:
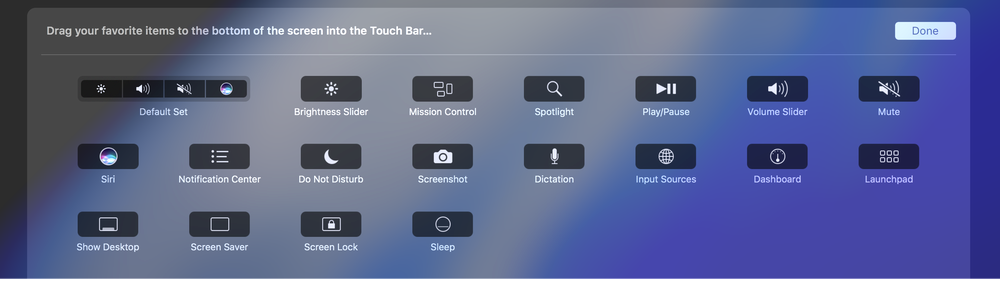
When you’re in this view, you can also move the icons on the Control Strip itself around, as you can see here with me moving Siri from the rightmost spot:

But let’s actually drag down and add the Screenshot button:

Magically, you drag it below the bottom and it shows up on the bar itself, ready for you to move around with your finger and customize:

A little fiddling and here’s what I ended up with as my perfect Control Strip that reflects my most commonly used functions:

Oh, and a great special TouchBar bonus: Look what happens when I do tap on the Screenshot button:
![]()
As someone who takes a lot of screenshots, this is a hugely helpful feature!