My son has been wanting to learn how to use the command line on his MacBook Air and asked me to change his login shell. I’m a bit lost with all of this, but can you advise how to change parameters on a MacOS 13 account?
While it’s true that 99% of what you want to do on a modern computer can be done through the graphical interface, there’s still something fun and engaging about typing in commands and having the system respond. I get it. In fact, I will suggest that your son consider acquiring a copy of my older – but still accurate! – book Learning Unix for MacOS X from O’Reilly. A used copy can be picked up pretty cheaply and it’ll give him all the basics that are so important for being able to work on the command line in MacOS without hiccups or problems.
Modifying aspects of user accounts on any multiuser OS can be fraught with risk, however, so I’m actually going to start with a warning: Changing login shell is no big deal, but change the login account name or home directory and you can break the account or even potentially lose every file and document currently in the account. You’ll need to be careful!
CHANGE INTERACTIVE SHELL IN MACOS
Turns out that if your son is comfortable at the command line, he can actually switch his functional shell with his very first command once he launches Terminal from the Utilities folder in Applications. Here’s how I might switch to Bash, for example:
$ exec /bin/bash
While you can just type in “bash” to launch the desired user interaction “shell”, that results in both the login shell and the specified shell running simultaneously. The exec command replaces the current shell with the specified shell. The benefit of this approach is that there’s no chance of messing things up; if he specifies a weird program that won’t work (like “exec /bin/ls” which will produce a directory listing and then log out) it hasn’t broken the account and a new Terminal window will get him back on track.
The next step up, still on the command line, is chsh, which is the change [login] shell command. First, identify the current shell with “echo $SHELL” then what interactive command shells are available with “cat /etc/shells“. Like this:
$ echo $SHELL
/bin/zsh
$ cat /etc/shells
# List of acceptable shells for chpass(1).
# Ftpd will not allow users to connect who are not using
# one of these shells.

/bin/bash
/bin/csh
/bin/dash
/bin/ksh
/bin/sh
/bin/tcsh
/bin/zsh
You can see that my default shell is the Z Shell, zsh. That’s the default for accounts on MacOS.
Now to use chsh to change the default login shell. Key to realize; you have to specify one of the command shells listed in the /etc/shells file or it will fail. But if I wanted to change my login shell from zsh to bash, here’s how I’d do it:
$ chsh -s /bin/bash
Then simply log out and log in again. The new shell should be in use!
But what if you don’t want to use the command line? Turns out that there’s a secret feature in MacOS 13 that lets you change login shells and a bunch of other info related to individual user accounts too! Let’s have a look…
ACCESSING THE SECRET MACOS ACCOUNT INFO WINDOW
Go into System Settings off the Apple menu and you’ll find a section labeled “Users & Groups”:
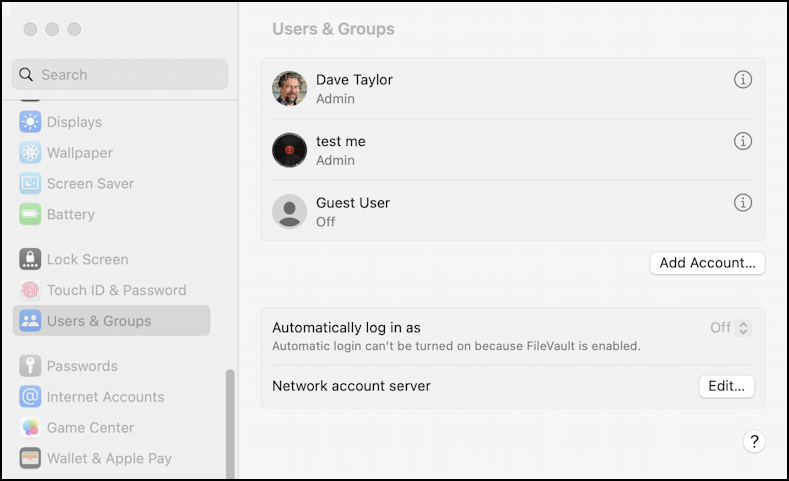
Click on it and there’s a list of all user accounts. For my system, it’s me, a test account “test me” I use to experiment with features and settings, and a Guest account that I have disabled for security reasons. Want to disable your Guest account? Here’s how, courtesy of Apple.
Click on the “i” adjacent to an account and there’s a small window that appears with a couple of settings:
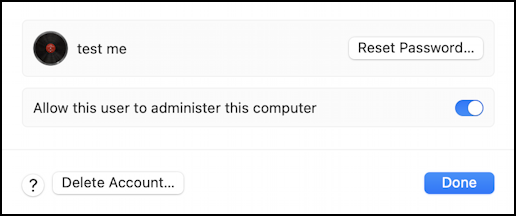
A few basic features and options, but what if you want access to more account settings but don’t want to launch Terminal and type it all in on the command line? Close this window so you’re back at the main User & Groups window and hold down the Control key while clicking somewhere in an account line:

The “Advanced Options…” button magically appears. Click on it and you’ll see a window with many more options instead:
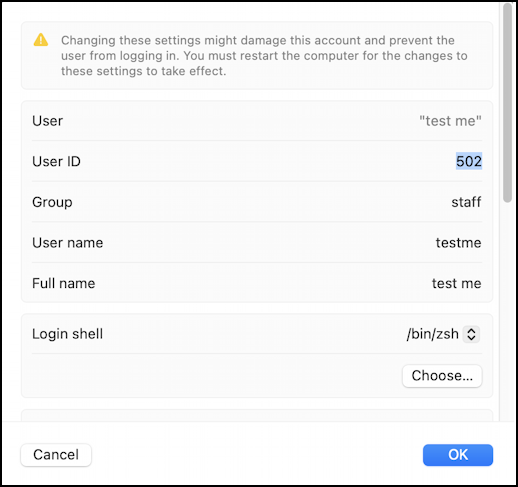
Lots of interesting fields to change but be careful! Change the username or User ID and you can break the account.
The mystery “Choose…” button is where you could specify a different home directory for this account; click and you’ll get a file selector window without explanation:
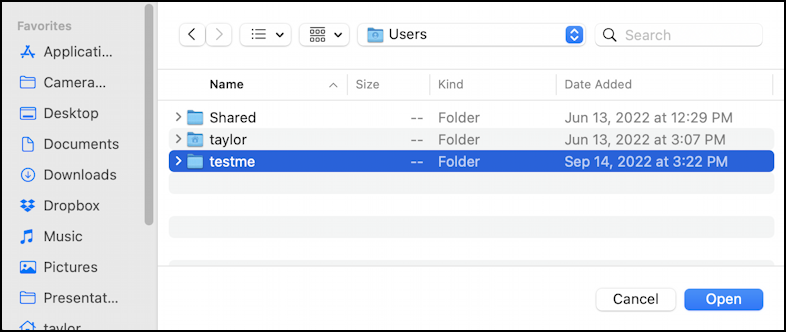
Notice that I’m in the “/Users” folder in the above. If you did want to change home directories for the account – and I recommend against it – at least ensure that you’re in the correct folder for the system. But, seriously, your son should leave it alone unless he’s a true expert. Instead, if he really wants to change user name and directory, simply create a brand new account instead.
Click “Cancel”. Now, from the advanced settings window, let’s change login shells… Simply click on the current shell and it will list all the possibilities:
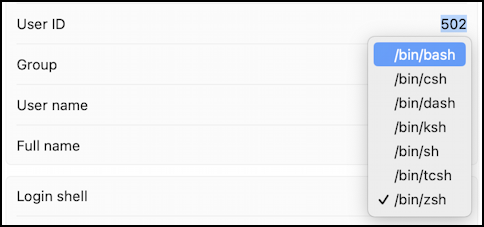
Simply choose the desired new login shell, close the window, and open up a Terminal window to experience the change. Done. And best of luck to your son, there’s lots to like with the command line interface!
Pro Tip: I’ve been writing about the Mac since the very first system was released. Please check out my extensive Mac Help Library and my Linux help library too while you’re visiting. Thanks!
