
I was telling my Dad that whenever I go to a new Web site, the first page load is crazy slow, though subsequent pages are really snappy. He said it’s a “DNS Server” issue. How can I fix that on my iMac?
While it’s easy to imagine that your Internet Service Provider (ISP) is offering up the equivalent of a “power line” allowing your devices to access the greater Internet, there’s more to the service than that. One of the biggest and most important tasks that an ISP aids is domain name lookup. We all prefer going to “netflix.com” rather than remembering the number 192.0.0.69, even though they’re the same thing. One of the unsung heroes of the Internet as we know and enjoy it is the system that does those lookups, a distributed system known as Domain Name Server or DNS.
There’s a lot of caching going on with DNS lookups too, which is why even if you have a really slow primary DNS server, subsequent pages are faster: Once you know that 192.0.0.69 = netflix.com, your Web browser can then use that information for the next few pages your request without “looking up” the domain IP address again. IP addresses are those 4-number, dot-separated sequences, also known as IP4 for just this reason.
Some ISPs have dedicated computers that just serve as DNS lookup devices, often delivering search results in tens of milliseconds. Search for an obscure domain name that’s hosted overseas and your computer won’t know it, your ISP might not know it, so the query will eventually bounce to a TLD or top-level domain server like “.tv” or “.net”. All of this tends to happen in fractions of a second so we rarely notice when everything’s working well.
But what you describe sounds exactly like a hosting company with a broken or misconfigured DNS server; the first query is always going to be a bit slower than subsequent queries, but the difference should be barely noticeable, not something where you’re wondering if you’re still online at all.
Fortunately, there are open DNS servers that you can use instead of your ISP’s faulty device that will work quite a bit faster and generally are better maintained too. Top among those is the Google Public DNS Server, known by its IP4 address of 8.8.8.8.
FINDING YOUR CURRENT DNS SERVER ADDRESS
Let’s start by figuring out your current DNS server and how fast it is. This is best done on a Mac by opening up the Terminal app. Yes, time to trek into the digital jungle! You can find Terminal in the Utilities folder within Applications. Fire it up and you’ll have a command line interface where you have to type in commands. Old school, right?
The command you want to use is called “dig“, and you can follow it by a domain name. For example, “dig yahoo.com” (you can safely ignore the content to the left of your cursor in Terminal for this task):
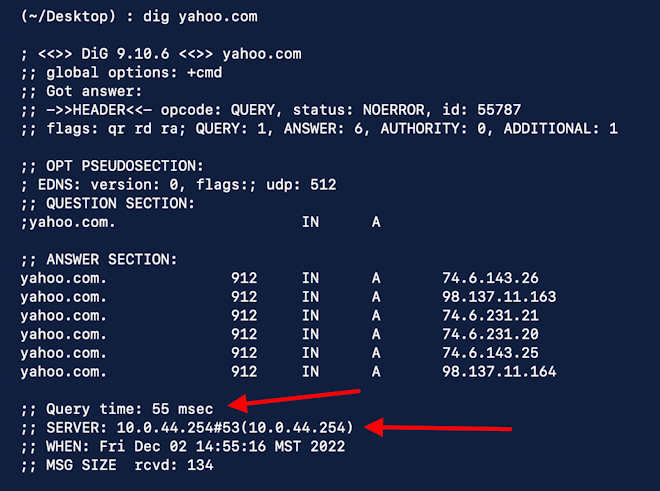
I’ve highlighted both the query time – a respectable 55 milliseconds – and the address of the server that the current Internet provider is allowing me to use: 10.0.44.254. To see how your system is working, try to pick a fairly random domain name that you haven’t visited in at least a few days. Try louvre.fr or ayersrockresort.com.au to see how fast – or slowly – it’s resolved into its IP address.
In this instance, I’m on a fast connection: 55ms is an entirely acceptable speed for a domain name lookup. But what if it were 970ms or even more? Every computer will let you change the DNS server address, typically found in the TCP/IP or Internet connection settings and preferences.
CHANGE DNS SERVER ADDRESS IN MACOS
MacOS 13 Ventura dramatically changed the appearance of the System Settings area, but the functionality is still the same as previous version of the operating system. Go to “System Settings…” off the Apple menu, then choose “Wi-Fi” from the list of possibilities:

Y0u can see that I’m connected to the local wireless network RED FROG COFFEE. Click on “Details…” and you’ll be able to see (and change) all sorts of settings and options related to this particular network connection. Then click on “DNS” on the left side to check out the DNS Server or Servers. Here at Red Frog, we’ve already ascertained that the DNS Server is 10.0.44.254:
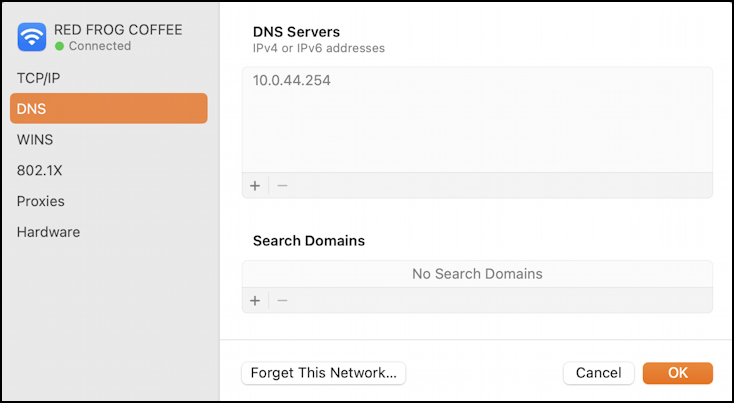
If you’re having DNS problems, the address in the top box is exactly the problem. Replace it by clicking on the “+” button and simply typing in the new address, like 8.8.8.8:
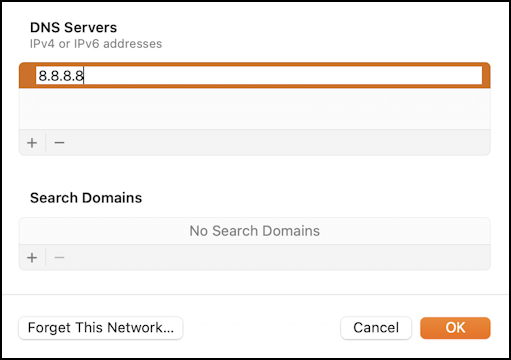
The interaction is a bit clumsy because I think there’s an interface bug in the code here in the current version of MacOS, but click “OK” then go back into the “Details…” > “DNS” area to confirm it worked:
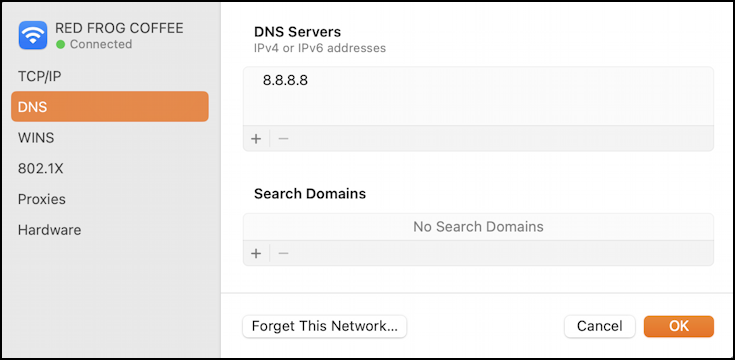
Looks good! Congrats, you’ve just changed the DNS Server address for your current Internet connection to speed up your interaction on the Web.
TESTING A NEW OPEN DNS SERVER LOOKUP
To test and see if it works and whether it’s faster, simply go back to the Terminal and type in “dig” followed by a new domain that you haven’t searched before. Perhaps tajmahal.gov.in or wwf.mg if you want something exotic and rarely visited. This time I’m just going to show the very bottom portion of that “dig” command:
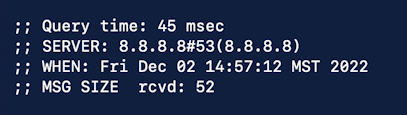
This time notice that the lookup was faster – 45ms instead of 55ms – and that it used the Google Public DNS Server at 8.8.8.8 to do the job. Nice. I just sped up my Web interaction and experience and I bet you did too if you’ve switched.
That’s it. Test out the DNS lookup with your ISP and if it’s slower than you’d like, try switching to the Google service or another open DNS choice to see if that speeds things up for you. Good luck!
Pro Tip: I’ve been writing about the Mac since the very first system was released. Back in the era of the “fishbowl” design! Heck, I started my computing career on an Apple II. Please check out my extensive Mac Help Library while you’re visiting. Thanks!