
I run Time Machine backups on my Mac system and recently accidentally deleted a file. Now I need to recover it. How do I actually use Time Machine in Mac OS X?
Backup systems have two basic tasks, to back up all your files, hopefully invisibly, and to make it super easy for you to recover any files you’ve lost, gotten corrupted, deleted or otherwise. Too many systems make one or the other easy, but it’s rare to have both be simple. And even Apple’s Time Machine works better as a quiet backup system than as a recovery system because it’s hard to figure out how to get into Time Machine to recover the lost file or folder.
Fortunately you have this simple tutorial to read, and once I figured out how to take screen shots of Time Machine in action (not a simple thing) it’s all easy to understand with one handy Mac trick…
To start, here’s a folder on my Mac OS X 10.10 Yosemite system where I recently had a file vanish:
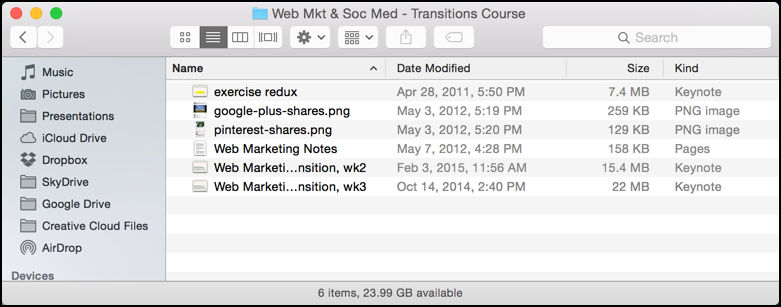
You can see the problem if you look closely: I have “wk2” and “wk3” but no “wk1”. Ooops.
This is where it’s a bit confusing: I need to launch Time Machine while looking at the folder with the missing content to start out there and make recovery a lot easier.
How to do so, though?
Through the fabulously useful Spotlight search and launch capability, of course!
Simply type Command-Space (e.g., hold down the Command key and press the Space bar) and type in “time machine”. It’ll look like this:
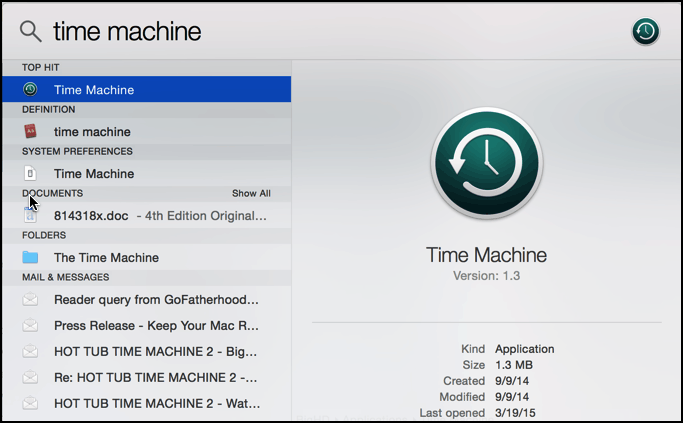
Matched. Now just press Return to launch it.
When you do so, be prepared because your entire Desktop, everything you know about the Mac interface, it all vanishes, to be replaced by this sort of outer space interface:

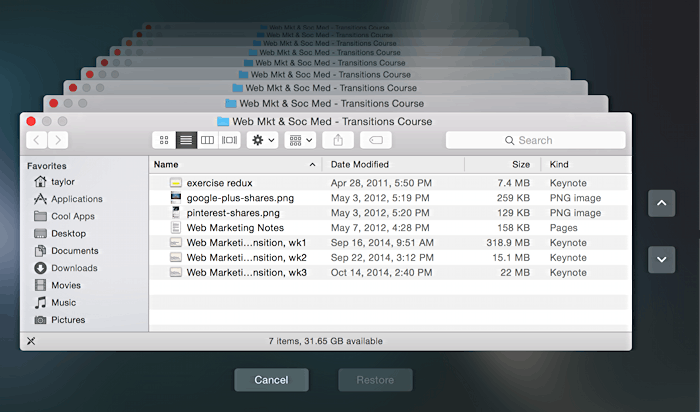
On the right edge is a timeline that denotes the date of each successful backup. You can jump to a specific backup — if you know that the file existed on a specific date — or you can click on the up/down buttons on the right side of the actual Finder window.
Let’s zoom in just a bit so you can see what I mean:

No surprise, the “Now” version of this folder is missing the “wk1” file. Not good.
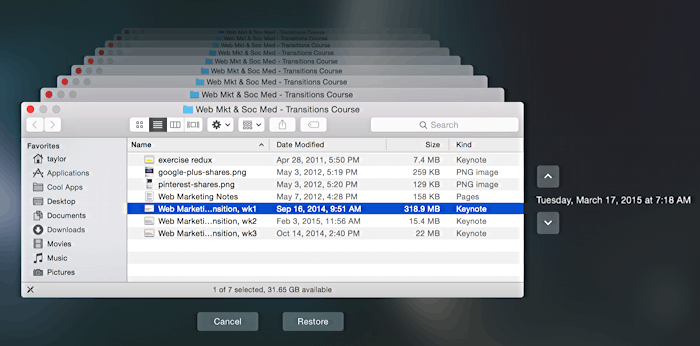
To step back in time click on the up arrow as many times as needed to find a version of the folder that has the file (or folder) you seek. For me it’s rather surprisingly a few weeks.
Finally, though, here’s what I find:
That’s the one!
To recover it, I select the file needed by clicking on it…
Once I select one or more items, I can then click “Restore” on the bottom.
I immediately leave the Time Machine interface and the file shows up, grayed out, in the Finder window:

There’s also a progress window that’ll show up on the top of your screen too:

When it’s done, we’re done. 319MB file recovered in just two or three minutes.
I can’t really explain why the Time Machine interface is so amazingly different to any other program in the Mac environment, but once you get the hang of it, I will say that it’s not difficult to work with. Just remember that little trick of launching Time Machine from Spotlight with that handy Command-Space sequence!
Hi Dave Taylor,
I have taken the full backup of my hard drive data using Time Machine. But, accidentally, all the data has been deleted from Time Machine Backup. Can you please suggest me some good software or some other ways through which I can recover my lost data from Time Machine Backup?