
I have a lot of files I want to hide from prying eyes. Is there a way to change a folder to be password protected or create an encrypted folder in MacOS X?
Every few months I get a question like this, either relating to Windows, MacOS or, sporadically, a Linux system. The answer is always that it’s hard to just slap a password on a folder but easy to create a new password protected entity that can contain as many files, folders, documents, photos and data as you’d like. That’s true across all operating systems, but it’s handy to know which is which. On a Mac, for example, you’re really creating a new virtual disk so it’s going to behave exactly as an external USB flash drive or hard disk would, except it’s always on your Mac hard disk itself.
Sounds complicated, but it’s pretty easy and pretty cool both. I use just such a password protected virtual drive “folder” to save copies of my legal documents and tax returns and various spreadsheets in an encrypted folder on my own Mac system. If someone got ahold of my Mac, they still couldn’t read any of my sensitive data.
Let me show you how I created it. To start, here’s a folder full of images, a few documents and a half-dozen MOV files on my MacBook Pro:

It’s a folder. You’ve seen thousands of ’em.
Just about everything will be done within the Mac utility “Disk Utility“. Easiest way to get there is to simply press Command-SPACE to jump to Spotlight (the search system built into your Mac) and type in “disk utility”:

Spotlight is fantastic: If you’re not using it, you really should learn how it works and try it!
In this case you can launch the Disk Utility program by clicking on the matching program’s icon on the right side. It launches and looks like, well, a disk utility, not something that’s going to help with creating an encrypted folder:
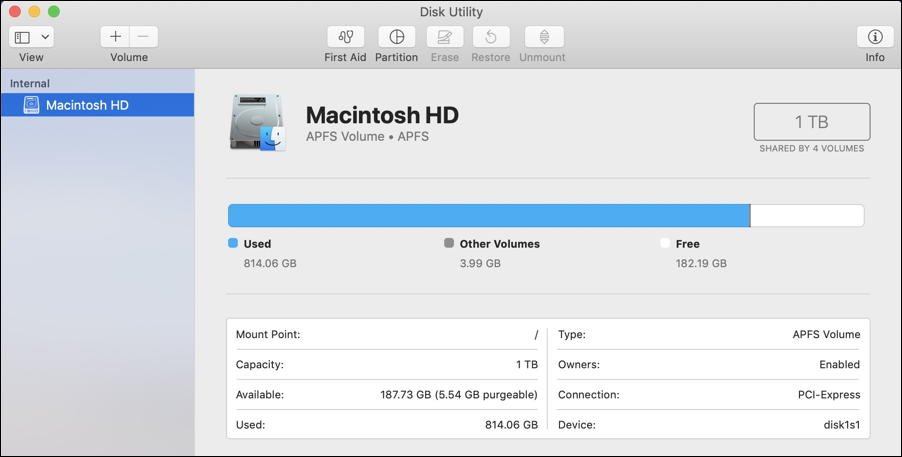
It’s showing me the state of my root or boot disk here: Macintosh HD is 1TB in size and I have 182GB free. It’s pretty full. 🙂
We’re going to ignore all of that, however. Go to the File menu and select as shown:

You might be able to get the idea from here but let’s keep moving.
As a first step you’ll want to select the source folder, then you can rename it as desired:

More importantly notice the two lower options: Encryption and Image Format. Let’s look at the former first:

For just about everyone 128-bit AES encryption is plenty secure enough, but if you’re really paranoid, yes, 256-bit encryption is more secure. It will slow things down because your Mac has to encrypt / decrypt as it goes.
The other option is image format and there are quite a few options here too:

I suggest ‘compressed’ because why not try to minimize disk space utilized for the password protected contents while you’re working? You can, however, set it up as read-only (which means you won’t be able to add new content later), a generic read/write format, a DVD or CD disk master image (which you could then “burn” onto a physical CD or DVD disk if you have the appropriate hardware) or even what’s known as an ISO image, a virtual DVD that can pretend to be a Blu-Ray disc, a movie or music CD or a software distribution entity.
Probably “compressed” will work fine, so leave it at that default setting!
Once you choose an encryption, it’ll prompt you for a password:
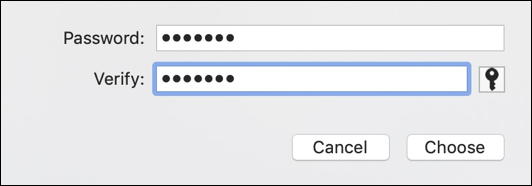
Pick something you’ll remember because if you forget it, you’ll have completely lost all access to that data. Forever. Not good. I use highly memorable names for mine, but a random hacker/thief will never guess with a dictionary attack!
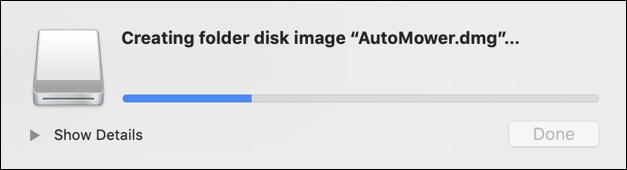
Once you’ve specified that, you’re basically done with this process. The app does some work creating the virtual disk…
and once it’s done you’ll see a new icon on your Desktop (or wherever you specified):

You can safely quit Disk Utility now.
To see how this all works, double-click on the new DMG “disk image” file on your Mac. It prompts you for a password!

Enter the wrong password. It won’t open. Cool, eh?
Now enter the correct password (double click on the icon again as needed). Now it’ll show up as if it’s an external drive:

And that’s it. Nicely done. You can open it up, add files, remove files, etc. When you’re done, simply “Eject” the virtual drive and it’ll go back to being a password protected virtual disk “folder” for all your files, photos and data. Done.
Pro Tip: I’ve been writing about the Mac operating system for decades. Really. Check out my extensive MacOS X help area while you’re here on the site. Thanks!