
I get a lot of email from Apple into my Apple Mail account on my Mac. Everything else goes to my corporate email account. Can I automatically forward important messages from Apple Mail to another email account, but also save them in case I miss one?
It’s unquestionably more convenient to have a single inbox for every message from everyone. Consolidation makes it much easier to manage things and ensure you don’t miss out on the important few that trickle in every day. However, for lots of people that’s just not a reality and so they end up with two, three, even four or more inboxes. Add social networks and you can easily have a dozen email inboxes spread throughout the Internet, which can end up being pretty crazy! I know, I have just that situation too, between Facebook, Twitter, LinkedIn, NextDoor, Alignable and all of the email services I use too. Yikes.
Fortunately, when it comes to Apple Mail, the default email program on every single MacOS X system, there are indeed ways that you can automatically forward email and have it as a way station rather than a destination. This is done through what Apple Mail refers to as Rules and once you get the hang of it, they’re remarkably powerful and quite useful for organizing and managing your email. Setting them up can be a bit confusing the first time through, so let’s go step by step.
What would be delightful would be if while you were viewing a message you could Control-Click and see “Create A Rule..”, right? Well, no:
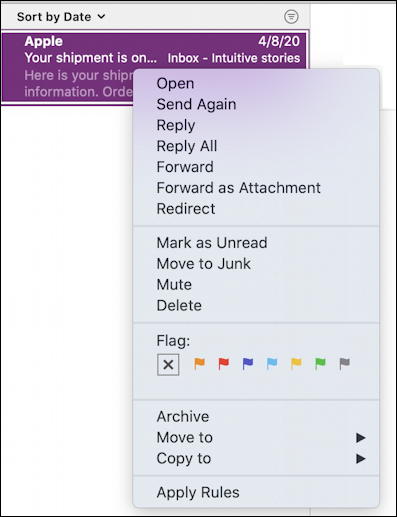
Curiously, you can “Apply Rules” from this menu, but there’s no shortcut for creating a rule. Instead, that’s actually done from the Preferences area of Apple Mail. To get to Preferences, go to Preferences... from the Mail menu:

Almost in the right spot. Now click on the “Rules” button along the top. It’s rightmost, so it’s easy to find:
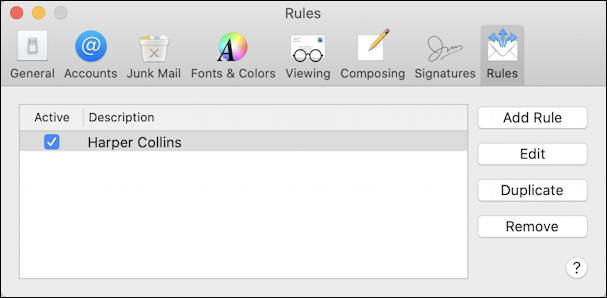
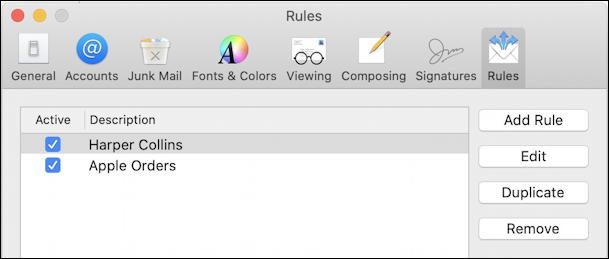
As you can see, I have exactly one rule for email from the team at Harper Collins books. To create a new rule you need to… you guessed it! … click on the “Add Rule” button on the right side.
That produces this window:
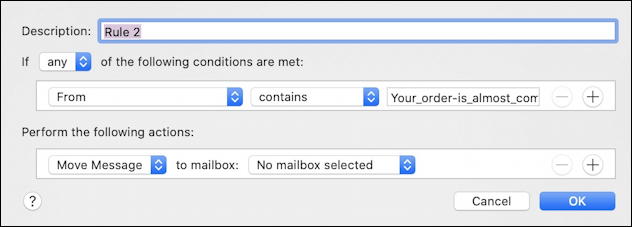
Here’s a really important thing to notice: By default it’s pulled information off of the currently selected email message. Notice that the From is “Your_order-is_almost_com…” that appears as the conditional test rule! So Apple Mail is smart about creating rules, but you just have to go to Preferences to find it.
Now you can really decide what you want to have occur with incoming email. The basic rule is if condition or conditions then action or actions. You can have pretty complicated rules too, like “if it’s from Susan and it has the word “dinner” in the subject line and it’s late afternoon then”. I typically filter by sending email domain or full address. In this case, I want to match all email related to my purchases at the Apple Store, so I’m going to prune the Your_order-is-almost_complete by clicking into the box and deleting it, character by character.
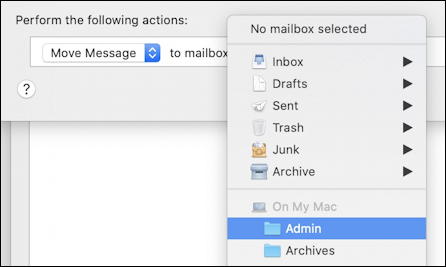
But first, I want to save these messages that match, so that’s easily done by clicking on “No mailbox selected”, at which point you get quite a list of options and possibilities:
Want to create a new folder on your Mac for these email messages? You can do that from the File > New Folder option, then select it here.
But you don’t have to just save the message. Click on “+” adjacent to any action and you’ll be able to add another one. There are a lot of different actions from which to choose too, including “Forward Message”:

And, finally, with a new rule name, a trimmed email address in the conditional area, and a couple of actions, here’s what I have as my rather fancy and sophisticated new Apple Mail email filtering rule:
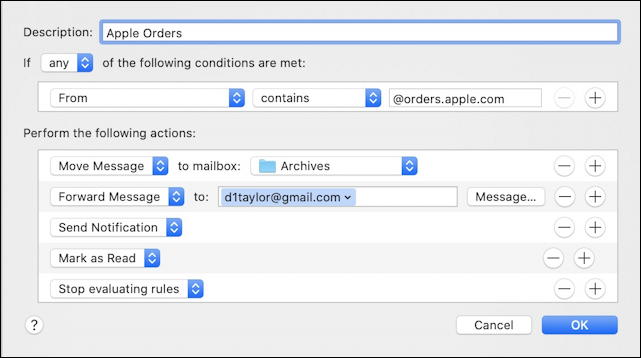
In a word, any email from @orders.apple.com with have the following sequence of actions performed: move message to Archives, forward message to d1taylor@gmail.com, send me a notification on the Mac, mark it as read, and stop evaluating rules for this email message. The latter is to ensure that an additional rule doesn’t end up being applied as you add more rules and filters to your email. Complicated, but I hope it does make sense?
Once you click “OK” Apple Mail is rarin’ to go:

You can click “Apply” and see what happens. It should work as desired!
Finally, don’t forget that you can edit or delete a rule at any time by going into Apple Mail Preferences:
And that’s it. Done. You’ve just become an Apple Mail power user. Nicely done!
Oh! One thing to remember: Apple Mail can only analyze incoming mail and apply these rules when it’s running. If you leave it running all the time, you’ll be fine, but if you quit the application when you’re not using it, these messages will just pile up, unanalyzed, waiting to be seen when you finally launch Apple Mail again!
Pro Tip: I’ve been writing about MacOS since before the “X” was involved. Please check out my extensive Mac help library for lots of useful tutorials on a wide variety of subjects.