
This is so weird: I just bought a new 500GB external hard drive but when I hook it up to my iMac, I get a little “not allowed” symbol every time I try to copy anything onto the device! Digging around, it appears to be connected “read only”. HELP!
While the majority of the time you should be able to just plug in any sort of external hard disk or drive, sometimes Mac OS X does get a bit picky about write permissions based on how the drive is initially formatted. In particular, it doesn’t natively support computer drives that are formatted as NTFS, the Windows NT File System, a very efficient file system designed for Windows computers that supports extremely large file sizes.
I had a similar experience myself when I hooked up my new 2TB external drive to my Mac Mini server, so I can show you how I fixed the problem. I will say that initially I too was befuddled and closely examined the hard drive itself to see if it had a “read only” switch. It didn’t. 🙂
So here’s what I saw when I looked at the drive on the Mac, within the Finder:
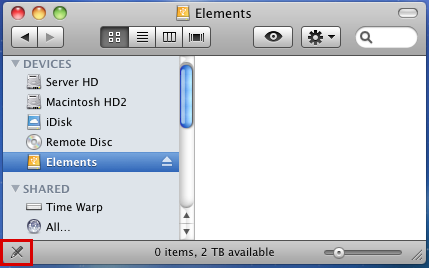
Notice the lower left corner? I’ve highlighted it: the pencil icon with the line through it. That’s the Mac’s subtle way of saying that you can’t write to it.
Chose File –> Get Info… to get more details:
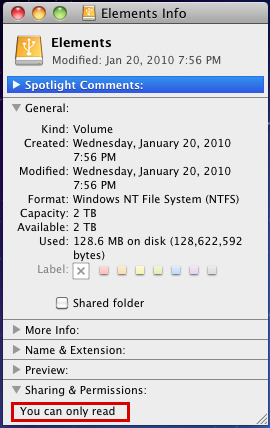
Again, you can see on the bottom that it says I can only read the drive contents, not write to it. Dead useless as a backup device, for sure!
To fix it, the path I took was to let the Mac erase and reformat the drive, figuring that since it was empty, there’d be nothing lost and I would be confident that it was then completely compatible with my Mac systems.
The program you want to accomplish this is in the Applications folder, within Utilities: Disk Utility. Start it up and you’ll see all the drives listed on the left side. Click on your new drive on the list to proceed:
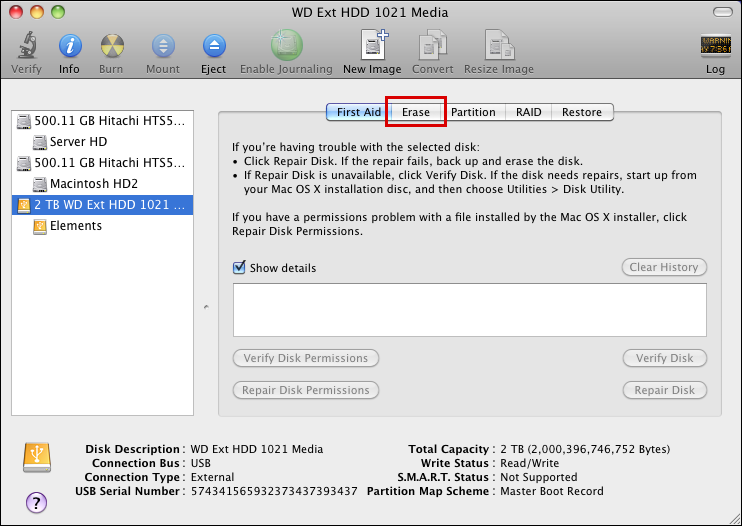
You’ll want to click on the “Erase” option along the top after you’ve picked the drive. In my case, it’s “2 TB WD Ext HDD 1021…”
Now you can pick which format should be used when the disk is rebuilt from the list:
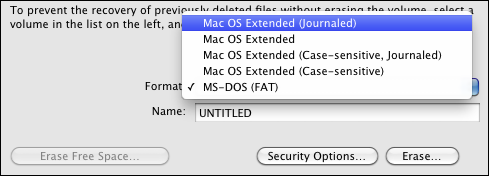
Since I know that I’ll never plug this drive into a PC, I’ll choose a Mac disk format, and of those, extended journaled is your best bet. If you wanted to have it be PC compatible, use MS-DOS format, but be warned that my experience is that read/write speed suffers on the Mac because of it having to reorganize data as it hits the drive.
Give the drive a name — I chose “Insurance” for mine — and click on “Erase…”
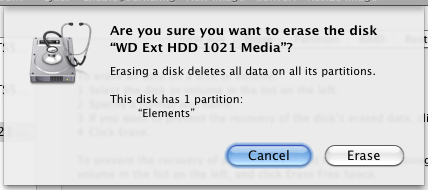
Ayup, there’s nothing on the disk, so let’s proceed. Click “Erase”. The resultant action will take a few seconds up to a few minutes or longer, depending on your drive size and speed…
Once it’s done you’re also done and good to go. What you might see, however, is a prompt asking if you want to use the drive with Time Machine if you’re running the slick Apple backup software:
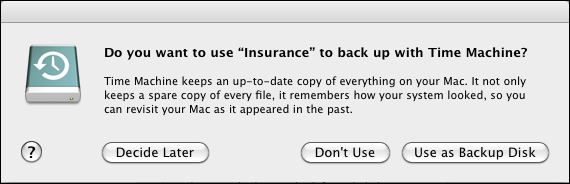
I don’t want to use it – I already have a disk drive specifically for Time Machine – so I click on “Don’t Use”.
Now, finally, one more peek at the newly renamed drive with “Get Info…”:
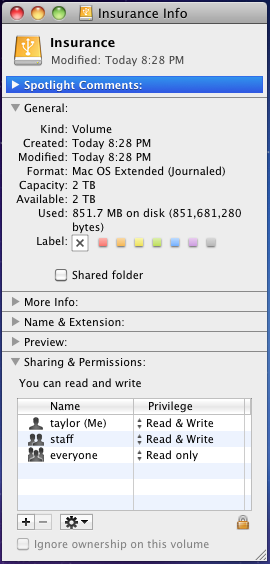
That’s solved the problem, and I am off on my merry backup journey. Hope that helps you out too!
If you’re dying to have NTFS support, btw, it appears that the only solution i to install some third-party software, specifically either MacFUSE or NTFS-3g.
The problem of external drives on the Mac becoming read only goes on and on. It does not only affect new drives that have been preformated for a PC but those already formatted for the Mac that have not previously had the problem and even the few that come preformatted for the Mac. Sometimes it happens to other external HDDs at the same time. This is obviously a problem with the operating system that, as so often, Apple refuses to acknowledge, let alone fix.
As for how to solve it, reformatting a disk that contains your stuff is not a good idea since it would have to be erased first, and bang goes your stuff. Even if you have backed it all up and can restore it, it’s still a pain.
The first thing to do is a restart (after saving what you have been working on to somewhere you can – e.g., the desktop). Restarting often overcomes MacOS glitches, which is what this is. Another method is to correct the privileges for that disk (not the permissions for the whole computer which can take forever). For this you will have to have an Administrator account. Using that, right click the disk icon and in the Info window look at Sharing & Permissions at the bottom. If you see the name of your account, just clicking on it will sometimes solve the problem. If not, select on Read & Write in the drop down menu to the right of the name under Privilege. If the name of your account does not appear and you have Administrator privileges, click on the lock icon at bottom right to unlock, then click the + button, select the name of your account from the drop-down list, then set the privilege for it to Read & Write. The method I find most convenient is to open Disk Utility, select a partition of the disk, click Unmount at the top of the window, then when it changes to Mount, click that. If the Info window is open you will see that Privilege has changed from Read only to Read & Write.
Unfortunately, none of these solutions is permanent. The problem will randomly recur and you will have to do it all over again. Thank, Apple.
It’s no more of an issue with macs than it is with windows compatible computers. ‘Read only’ messages can occur when trying to connect and use external drives on either operating system. It’s always annoying but it’s certainly not platform specific.
Thank you for your post, very insightful. Is there a way to do this without erasing the disk? I have a 2Tb WD My Book with all our wedding video footage on it with plenty of room left on the drive and it’s read only on my Mac. Obviously I can’t erase the contents. HELP! 😉
I have posted several solutions that do not involve erasing and reformatting the disk. The post is being moderated but hopefully will soon be available.
I know this thread is old, but this didn’t work for me. It leaves the message,”Could not unmount Disk” I have to get this sorted! Any suggestions?
When you see “cannot unmount disk”, Denese, it means that you’ve an open Finder window, have an app from the drive open or have an open file from the drive in an app you’re already running. Quit them all (or restart your computer) and try again!