
I’m a Mac guy, but now have a Windows 8 PC computer on my desk at work. Not the end of the world, but is there a way to share content between Mac and PC?
What you want is iCloud for Windows. In fact, I bet you’re already running iCloud and have a sharing account set up to keep your iPad, iPhone and Mac systems in sync. Don’t have any iOS devices because you’re an Android guy? Well, then you really do have a complicated world with Mac, Android and Windows all trying to play nicely together. That’s beyond the scope of what I can help you with here, but let’s just focus on the Mac and PC side of that equation.
If you don’t have iCloud set up yet then I suggest that you get it started with your Mac system, but Apple really pushes iCloud so odds are good that if you’re a Mac person, you’re already good to go. No? Then start here: iCloud for Mac.
On the Windows PC side, you’ll want to go to icloud com, but I’ll make it easy: click on the graphic below to get started:

Once you download the handy iCloud for Windows app to your Win7 or Win8 (or Win10?) system, launch it and you’ll see this:
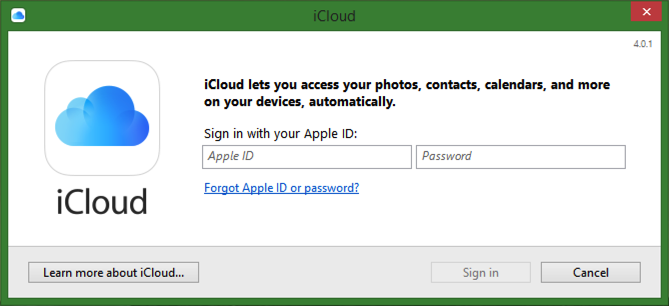
Log in with your Apple ID credentials (and note that you should use the one you have specifically for iCloud backups: I have more than one AppleID and when I forget and log in with the wrong one, suddenly I have no data, no photos, no bookmarks. No nuthin’. And it’s alarming!)
Once you log in it’ll spin for a bit while loading your setup and storage details…

Then finally — and with me it took about 20 seconds — it’ll ask if you want to send diagnostic info to Apple.
My recommendation: Do it. Why not help the product become more robust?

You can change your mind later if that doesn’t sound like something you want to do, of course. Either way, click a button.
Now it’ll show your current state and default settings:

Worth noting is that you should explore the options for both Photos and Bookmarks.
Let’s start with Photos. Click “Options…”

The important thing to get from this window is the iCloud Photos location at the bottom. You can — and probably should — change this to something like “iCloud Pics” in your “Pictures” folder, but even if you leave it as the default setting, make a note so you can find it later!
In terms of My Photo Stream and iCloud Photo Sharing, both are great features and will magically migrate photos between all your iCloud devices, so a photo taken on your iPhone over the weekend could automatically be sitting on your PC when you get to work on Monday. Which might be good, or bad. So take the time to think about it, particularly if your work is very strict about personal use of computing resources.
Click “OK” when you’re ready, then click “Options…” adjacent to the Bookmarks with Chrome setting.
This one’s a bit more peculiar:

Why do I say it’s peculiar? Because the prompt is “with Chrome” but as you can see, iCloud actually has the ability to sync bookmarks with Microsoft Internet Explorer and Firefox too. Super handy, but why have “with Chrome” if that’s the case?
More confusing, turns out that you can only sync bookmarks with Chrome for Windows if you install a specific iCloud extension. But we’ll get back to that. For now, just click on “OK”, then click on the “Storage” button near the bottom.
You’ll see this detailed view of how your storage is currently allocated:

You can delete big data files that are eating up space and you can buy more space with the “Change Storage Plan…” button.
Nothing too interesting here, just including it for completeness sake, ya know. Click on “Done”.
Click on “Apply” on the main window and it’ll try to start actually doing things. Go figure. First up, how to handle bookmarks:

Click “Merge” and you’ll have your PC bookmarks show up on the Mac and – more importantly – your Mac bookmarks show up on your Windows PC.
Then it’ll ask one more question…

You do want this. It’s easy. Click on “Download…”
Chrome launches, and it immediately takes you to the right spot to download the iCloud extension:

Click on the “Free” link on the top right and it does all the work.
You’ll know it’s done and worked when you see this:

That’s it. You’re done.
Congratulations. Now your work PC will stay in sync with your home Mac system and your iOS devices as you add bookmarks, photos, etc.